Simple command to create an ISO image of a CD or DVD on Redhat rhel 5.1.
NO ADDITIONAL software or utilities need to be installed but the interface is not exactly user friendly
dd if=/dev/hdc of=/tmp/my_cd_backup_iso_file.iso
However, if you want to 'burn CD' from an iso file on a redhat ide type CDRW drive ,use:
cdrecord -v -dev ATAPI:/dev/hdc -data my_iso_file_to_burn.iso
To Blank a rw dvd
make sure dvd+rw-tools.i386 package is installed
yum listgrep dvd
or download from rhn
yum install dvd+rw-tools
then format the dvdrw
/usr/bin/dvd+rw-format /dev/cdrom
Happy burning!
CS
IT Support London since 1990
Email us

Business I.T support Brighton from LJE Ltd.
Wednesday, 10 December 2008
Friday, 28 November 2008
Find real Version of Redhat Installed
uname -a will show you the kernal discription and type
ie. Linux rh-64.test.dev.ldn 2.6.18-92.el5 #1 SMP Tue Apr 29 13:16:15 EDT 2008 x86_64 x86_64 x86_64 GNU/Linux
but to find the actual version of Red Hat you are running
more /etc/redhat-release
i.e Red Hat Enterprise Linux Server release 5.2 (Tikanga)
Cheers
Chris
ie. Linux rh-64.test.dev.ldn 2.6.18-92.el5 #1 SMP Tue Apr 29 13:16:15 EDT 2008 x86_64 x86_64 x86_64 GNU/Linux
but to find the actual version of Red Hat you are running
more /etc/redhat-release
i.e Red Hat Enterprise Linux Server release 5.2 (Tikanga)
Cheers
Chris
Thursday, 20 November 2008
Easy Guide to dual booting Mac OS X with Vista or XP
The new hardware from apple is ideal for anyone wanting to use the best of Microsoft and Apple on one piece of hardware
Thanks to some clever utilities called 'Boot Camp' it is very easy to install Windows Vista or XP
onto any exisiting Mac OS X Partition
Simply enter the utility and follow the instructions to create a new windows partiton and boot into the regular vista setup, then install xp or vista to the new seperate partition.
Once installed all the VGA, Ethernet, Airport and sounds drivers can be easily installed too, by inserting the regular Mac OS X DVD and runing the setup.exe.
The windows setup.exe version of 'Boot Camp' drivers, even setup apple keyboard for windows too.
The whole process took us under 45 mins to complete, when using Macos 10.5 and Vista Business edition, without any loss of data to the Mac partition and full hardware compatability.
Only downside we have seen is that some recent Microsoft updates trashed out first attempt, rendering Vista unbootable and unrepairable. So its probably best to backup the Windows partition before installed any Microsoft Service packs, especially on Vista.
So far though, weve been very impressed with this cool utility which gives a new Apple user a real value for money experience and easy acessability to their old Windows files and applications
Akbel
Friday, 7 November 2008
Apple Mac Workshop Repair Manuals
Weve now published popular Apple Mac WorkShop repair manuals for you to download via http://www.diycomputers.org.uk , our FREE advice site for people wanting to attempt to repair their own Mac's
Current Mac workshop service manuals included for you to download are:
Mac Book Pro 15 inch Repair Manual 2008
Mac Book 13 inch Repair Manual 2008
Mac Mini Repair Manual
iMAC G5 20 inch LCD Repair Manual
eMac Repair Manual
iMac CRT repair Manual
Powerbook Pro G4 15 inch FW 800 Repair Manual
see http://www.diycomputers.org.uk for the full listing
All steps to upgrade RAM, Replace Hard Drives , fix LCD, upgrade super drive etc are included.
If you need an help with apple spares or advice on Mac repair in London, please call us for a quote +44 207 112 6744
cheers Akbel
Apple Mac useful, boot keys and mouse short cuts
For any Apple Mac newbies here's a listed of Special Keys on the Apple Keyboard which can be used to help you diagnose issues with your Mac.
CMD Key= apple symbol key
Opt Key = Alt key
Magic Keys used by Mac Hardware "Magic Keys" hold down during boot
• Cmd-V Verbose startup (text console)
• Cmd-S Single user mode
• Opt select which device to boot from Hardrive, External Hard Drive, CD etc
• T Export internal Disk as firewire device
• C Boot from CD-ROM
• N Boot from Network
• X Switch boot device to MacOS X folder
• Opt Boot device selection
• Cmd-Opt-O-F Enter OpenProm prompt
Password ( to add passwd to FIRMWARE)
Setenv Security-mode full ( to maximise security security-mode="none" resets secuirty
printenv ( shows all variables)
Mac-boot ( restart mac -softboot)
Cmd ( boot with virtual memeory switched off v8-9x only)
Shift (boot withour extentions, control panel,startup optionr or virtual memory)
Space ( open extension manager)
R: (Force PowerBook to reset screen)
• Cmd-Opt-P-R Flush OpenProm nvram reset systems devices to default
"Magic Keys" during operation
• Cmd-Shift-3 Create screenshot
• Cmd-Alt-Esc End program
• Ctrl-Cmd-Opt-8 Switch to Black and White :)
Settings for boot-args - may be set by command nvram or in the OpenProm
prompt:
• -v Verbose boot
• -s Single user
• -x Safe (used by kextd)
Mac OS X keyboard shortcuts.
Startup Keystroke Description
Press X during startup Force Mac OS X startup
Press Option-Command-Shift-Delete during startup Bypass primary startup volume and seek a different startup volume (such as a CD or external disk)
Press C during startup Start up from a CD that has a system folder
Press N during startup Attempt to start up from a compatible network server (NetBoot)
Press R during startup Force PowerBook screen reset
Press T during startup Start up in FireWire Target Disk mode
Press Shift during startup start up in Safe Boot mode and temporarily disable login items and non-essential kernel extension files (Mac OS X 10.2 and later)
Press Command-V during startup Start up in Verbose mode.
Press Command-S during startup Start up in Single-User mode
Finder window
Keyboard shortcut Description
Command-W Close Window
Option-Command-W Close all Windows
Command-Right Arrow Expand folder (list view)
Option-Command-Right Arrow Expand folder and nested subfolders (list view)
Command-Left Arrow Collapse Folder (list view)
Option-Command-Up Arrow Open parent folder and close current window
Menu commands
Keyboard shortcut Description
Shift-Command-Q Apple Menu Log out
Shift-Option-Command-Q Apple Menu Log out immediately
Shift-Command-Delete Finder Menu Empty Trash
Option-Shift-Command-Delete Finder Menu Empty Trash without dialog
Command-H Finder Menu Hide Finder
Option-Command-H Finder Menu Hide Others
Command-N File Menu New Finder window
Shift-Command-N File Menu New Folder
Command-O File Menu Open
Command-S File Menu Save
Shift-Command-S File Menu Save as
Command-P File Menu Print
Command-W File Menu Close Window
Option-Command-W File Menu Close all Windows
Command-I File Menu Get Info
Option-Command-I File Menu Show Attributes Inspector
Command-D File Menu Duplicate
Command-L File Menu Make Alias
Command-R File Menu Show original
Command-T File Menu Add to Favorites
Command-Delete File Menu Move to Trash
Command-E File Menu Eject
Command-F File Menu Find
Command-Z Edit Menu Undo
Command-X Edit Menu Cut
Command-C Edit Menu Copy
Command-V Edit Menu Paste
Command-A Edit Menu Select All
Command-1 View Menu View as Icons
Command-2 View Menu View as List
Command-3 View Menu View as Columns
Command-B View Menu Hide Toolbar
Command-J View Menu Show View Options
Command - [ Go Menu Back
Command - ] Go Menu Forward
Shift-Command-C Go Menu Computer
Shift-Command-H Go Menu Home
Shift-Command-I Go Menu iDisk
Shift-Command-A Go Menu Applications
Shift-Command-F Go Menu Favorites
Shift-Command-G Go Menu Goto Folder
Command-K Go Menu Connect to Server
Command-M Window Menu Minimize Window
Option-Command-M Window Menu Minimize All Windows
Command-? Help Menu Open Mac Help
Command-Space Open Spotlight (Mac OS X 10.4 or later)
Universal Access and VoiceOver
Keyboard shortcut Description
Option-Command-* (asterisk) Turn on Zoom
Option-Command-+ (plus) Zoom in
Option-Command-- (minus) Zoom out
Control-Option-Command-* (asterisk) Switch to White on Black
Control-F1 Turn on Full Keyboard Access
When Full Keyboard Access is turned on, you can use the key combinations listed in the table below from the Finder.
Control-F2 Full Keyboard Access Highlight Menu
Control-F3 Full Keyboard Access Highlight Dock
Control-F4 Full Keyboard Access Highlight Window (active) or next window behind it
Control-F5 Full Keyboard Access Highlight Toolbar
Control-F6 Full Keyboard Access Highlight Utility window (palette)
Command-F5 or fn-Command-F5 Turn VoiceOver on or off (Mac OS X 10.4 or later)
Control-Option-F8 or fn-Control-Option-F8 Open VoiceOver Utility (Mac OS X 10.4 or later)
Control-Option-F7 or fn-Control-option-F7 Display VoiceOver menu (Mac OS X 10.4 or later) Control-Option-; or fn-Control-option-; Enable/disable VoiceOver Control-Option lock (Mac OS X 10.4 or later)
The Universal Access preference pane allows you to turn on Mouse Keys. When Mouse Keys is on, you can use the numeric keypad to move the mouse. If your computer doesn't have a numeric keypad, use the Fn (function) key.
Mouse Keys Keystroke Description
8 Move Up
2 Move Down
4 Move Left
6 Move Right
1, 3, 7, and 9 Move Diagonally
5 Press Mouse Button
0 Hold Mouse Button
. (period on keypad)
Release Mouse Button (use after pressing 0)
Other Commands Keystroke Description
Option-Command-D Show/Hide Dock Command-Tab Switch application tab Highlight next item
Command-Up Arrow Move up one directory
Command-Down Arrow Move down one directory
Page Up or Control-Up Arrow Move up one page
Page Down or Control-Down Arrow Move down one page
Option-Drag Copy to new location
Option-Command-Drag Make alias in new location
Command-Drag Move to new location without copying
Shift-Command-C Show Colors palette in application
Command-T Show Font palette in application
Command-Shift-3 Take a picture of the screen, equivalent to Print Screen on PC
Command-Shift-4 Take a picture of the selection
Command-Shift-4, then press Control while selecting Take a picture of the screen, place in Clipboard Command-Shift-4, then Spacebar Take a picture of the selected window
Option-Command-esc Force Quit
Control-Eject Restart, Sleep, Shutdown dialog box
Control-Command-Eject Quit all applications and restart
Option-Command-Eject or Option-Command-Power Sleep Command-click window toolbar button (upper right corner) Cycle through available views for the window's toolbar (dependant on the nature of the Finder or application window)
Command-` Cycle through windows in application or Finder (if more than one window is
open)
Function-Delete (PowerBook, iBook only)
Forward Delete (delete the character to the right of your cursor)
Mount cd image:
Open terminal
cd /volumes
ls to show devices
cd "/volumes/eMac Restore CD/.images"
Open ./Classic.dmg ( this will attach the volume as another drive)
Have fun
Mark
Monday, 20 October 2008
resize linux root partition
The last year that ive been doing I.T Support in London, Ive seen quite a few linux servers which dont have sufficent root partition space.
So here's a procedure ive used several times to extend a ext3 root partiton and filesystem on redhat enterprise 5
If you use ext3 ( not LVM) as your root patition and you run out of space this procedure will enable you to create a larger partition, move existing root files to the new partition and expand the filesystem to new size.
You need to have enough spare disk space on your disk to create a large parition, or fit an additional disk to the server.
This guide is detailing resize2fs utility only. Other third party tools can change the partition itself, but this entry details our current procedure.
In this example partion 5 contains the original root partition and partition 6 is the next available spare area of disk
1.Always backup the partition you will be copying in case of errors.
2. boot from redhat cd1/dvd ( rescue CD or first boot cd)
at boot prompt type
:'linux rescue'
when prompted, dont mount the disk partitions you need to change
(umount /dev/sda5 if needed)
3. create the new partition 9no6) using fdisk
fdisk /dev/sda
(m)ake a new partion at the correct size ( partion 6)
(w)rite the partiton to disk
4. reboot and boot from rhel cd again for partition table to be loaded
fsck.ext3 -f /dev/sda5 ( check original fsystem is clean)
5. copy the old partion files to the new larger partition
dd if=/dev/sda5 of=/dev/sd6
(This can take some time, no progress is show)
Note: dd copies original partiton contents and filesystem size ( inodes), so when you next reboot it will apprear the new partion size has shrunk to the old partition size.
This is becase dd does a track by track copy of the original data including any spare filesystem.
As we hav'nt create the filesystem on the new disk so it is using exactly the same data as partition 5.
Logical Volume Manager (LVM) can be then used to create inodes upto the end of the new partiion size.
Remember resize2fs is not able to extend a partion itself ,only any unused filesystem within that partition.
6. Next you need to extend inodes to continue to the end of the new partion,but keeping the original copied root data untouched .
/sbin/resize2fs -p /dev/sda5 9000M ( extends the file system to 9 GB, the actual partition max size)
This will only extend the filesystem to the current partition size. As mentioned above, if the partition is not big enough (d)elete and (w)wrie the new partion again in fdisk.
Once the correct size and disk dump has completed ,delete the orginal partition on the disk.
In example if you remove sda5 then the new partition sda6 becomes sda5, so there is not need to change partition lables or edit /etc/fstab
Occasionally we have seen that you might need to rewite the journel if the disk doesnt mount properly on first reboot.
Boot from cdrom again,
tune2fs -j /dev/sda5
or tune2fs -O has_journal /dev/sda5 ( to remove the journel or make partition on an older ext version)
Have fun
Akbel
Friday, 10 October 2008
Red Hat 5 ip forwarding
By Default , whether firewall and SELinux are switched on or not, Traffic will NOT be routed between two network cards in a Red hat box. You need to manually setup as a router
To make the machine act as a router, you need to add some policies to iptables and enable
/etc/sysctl.conf net.ipv4.ip_forward=1
iptables -A FORWARD -i eth1 -j ACCEPT ( allow network ip's from eth1 thru )
iptables -A FORWARD -o eth1 -j ACCEPT
add the line below to iptables script in /etc/init.d/iptables
iptables -t nat -A POSTROUTING -o eth0 -j MASQUERADE
masks requests from LAN nodes with IP of the eth0
Note: masquerade not show in /sbin/iptables -L for some strange reason
In the example above eth1 is Internet side eth0 is private LAN
Set the default gateway to pint to dns/inetrnet router
test from client on Private LAN ,should be set to defaultgateway to eth1 to test packet forwarding.
On Linux Check operation using /usr/sbin/tcpdump -X port 80 -i eth0 -w filename
/usr/sbin/tcpdump -r filename -X port 80
Regards
Chris
Monday, 28 July 2008
Increasing SBS 2003 MS Exchange 2003 Mailbox / Message store sizes
By default all MS SBS users have a maximum mailbox size of 200MB.
The user will receive a message in outlook indicating their mailbox has reached its limit at 175MB
This can be increased individually per user up to 2GB ( 2097151 KB) using the SBS Server Management, Users, Exchange General Tab and Storage Limits button
This can be increased individually per user up to 2GB ( 2097151 KB) using the SBS Server Management, Users, Exchange General Tab and Storage Limits button
However this can mean one user is hogging the whole exchange storage. So lets look at the big picture

ALSO REMEMBER this will also effect the maximum users that you can support of your SBS server, as well as it being harder to administer the system ( if all users max mailbox sizes are different)
All Mail box sizes are displayed from SBS server
Administrator tools, Server Management, Advanced, Exchange, Administrive groups, First Administrive Group, Servers,
Total storage group size =(user1+user2+user3)
Default of the whole mailbox store database is limited to 18GB following the installation of Exchange 2003 Service Pack 2. A registry change is required to enable the database to grow to the new 75GB limit
This is covered in step by step instructions via http://go.microsoft.com/fwlink/?LinkId=67569
DO NOT go any further unless you have a full system backup including the mailbox stores. Corruption can result if mistakes are made and it may require a complete reload of Windows 2003 SBS and or Exchange 2003.
Once you have unmounted , reconfigured new storage size ( using regedit) for mailbox store and remounted the message store (with no errors in event viewer) you need to configure message store monitoring..... This comes a little tricky
You want event viewer to tell you if the databse is getting full or possibly email you so you can perform maintenance.
But, once again, if you try and use Exchange Mailbox Store properties, Limits, you cant set the value above 2097151 !
So to increase the maximum database size warning threshhold "Issue Warning at" or "Prohibit send and receive" , instead of the Exchange gui, you need to use adsiedit
This tool can create some real damage, so be careful.
First you need to download adsiedit plugin ( Windows Support tools) from
Then install the support tools in c:\program files\support tools
Run a DOS command prompt from c:\program files\support tools\adsiedit.msc
If you want to increase users mailbox above 2GB you will also need to follow instructions, as once again the gui is set NOT to allow greater size than 2097151
NOTE: We had Error setting the mailbox store value as detailed by Microsoft on our SR2 SBS 2003 servers.
We saw "the server is unwilling to process this event" using the configuration MS recommend. All values where Greyed out and we could amend the size parameters
Instead we configured using different adsiedit paramters found in
Configuration [YOUR_SERVER.YOUR_DOMAIN.london]
CN=Configuration,DC=YOUR DOMAN,DC=london
CN=ServicesCN=Microsoft Exchange
CN=YOUR_DOMAIN
CN=Administrative Groups
CN=first administrative group
CN=Servers
CN=YOUR_SERVERNAME
CN=InformationStore
CN=First Storage Group
CN=Mailbox Store (YOUR_SERVERNAME)
like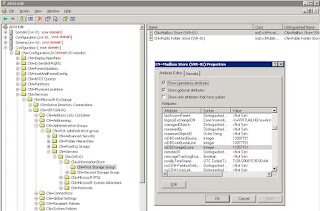
like
the mDB parameters map to Exchnage gui parameters
mDBStorageQuota Prohibit = Issue warning at (KB)
mDBOverQuotaLimit Prohibit = Prohibit send at (KB)
mDBOverHardQuotaLimit = Prohibit send and receive at (KB)
The user parameters also needed finding for us on SBS too.
Domain [YOUR_SERVER.YOUR_DOMAIN]
DC=DOMAIN,DC=london
OU=MyBusiness
OU=Users
OU=SBSUsers
So you should now have configured a large Database size, and increased the monitoing of when theta data and user mailbox begin to be used again.
The only disadvantage of doing all this, is now you have to configure Database and user limits using adsiedit.smc, the SBS guis wont work above 2GB. I suspect this is resolved in 2008 SBS
Akbel
Friday, 25 July 2008
trace users to hostname on Windows domain - PsTools
After nbtstat was disabled by Microsoft you can now use a utility to search for usernames and PC's on the windows domain and see who is logged in.
Download the utilies from http://technet.microsoft.com/en-us/sysinternals/bb896649.aspx
then run
psloggedon BrainCant -l ( find where user is logged in )
and see something replied back like
'LONDON\BrainCant logged onto ldn-sales-pc24 locally'
or psloggedon -l \\ldn-sales-pc24
loggedon v1.33 - See who's logged on
Copyright ⌐ 2000-2006 Mark Russinovich
Sysinternals - www.sysinternals.com
Users logged on locally:
Error: could not retrieve logon time
NT AUTHORITY\LOCAL SERVICE
Error: could not retrieve logon time
NT AUTHORITY\NETWORK SERVICE
13/07/2008 08:25:50 LONDON\BrianCant
Error: could not retrieve logon time
NT AUTHORITY\SYSTEM
Other useful utilities are included to run service remotely and dump event logs are useful too
Ie pslist \\ldn-sales-pc24
Process information for ldn-sales-pc24 :
Name Pid Pri Thd Hnd Priv CPU Time Elapsed Time
Idle 0 0 4 0 0 762:12:56.359 0:00:00.000
System 4 8 85 2606 0 9:49:53.109 0:00:00.000
smss 384 11 3 21 164 0:00:00.359 218:21:51.437
csrss 440 13 12 1024 1936 0:05:43.421 218:21:46.671
winlogon 464 13 23 668 10596 0:00:48.781 218:21:39.093
services 508 9 17 487 7556 0:25:07.546 218:21:38.937
lsass 520 9 22 716 5144 0:25:50.796 218:21:38.921
svchost 692 8 22 241 3028 0:00:09.875 218:21:38.249
svchost 740 8 11 552 2492 0:02:44.609 218:21:38.077
svchost 808 8 65 1707 19544 0:04:57.250 218:21:38.015
svchost 924 8 6 87 1412 1:59:58.000 218:21:37.968
svchost 972 8 18 348 3304 0:00:05.437 218:21:37.921
spoolsv 1128 8 12 199 6344 22:05:51.109 218:21:37.405
scardsvr 1176 8 10 109 944 0:00:00.375 218:21:37.343
residentAgent 1288 8 7 106 1152 0:00:03.984 218:21:35.405
DACS_S~1 1336 8 4 74 18100 0:01:25.000 218:21:35.312
GoogleUpdaterService 1388 8 9 188 2496 0:01:56.531 218:21:35.280
LocalSch 1416 8 4 51 520 0:00:13.343 218:21:35.249
pds 1456 8 4 63 940 0:00:01.265 218:21:35.218
tmcsvc 1540 8 12 102 4200 0:00:04.781 218:21:35.077
issuser 1568 8 7 95 1848 0:00:00.765 218:21:35.046
Matrox.PowerDesk.Services 1628 8 2 44 4328 58:59:40.953 218:21:35.
015
FrameworkService 1672 8 35 387 9272 0:02:24.437 218:21:34.983
Mcshield 1744 13 53 432 83476 0:15:50.281 218:21:34.718
VsTskMgr 1780 8 17 307 7388 0:02:57.281 218:21:34.671
MDM 1860 8 4 98 1048 0:00:00.578 218:21:33.749
svchost 1976 8 2 67 1088 0:00:03.812 218:21:33.421
svchost 1988 8 2 69 1196 0:00:01.781 218:21:33.343
sync 2044 8 5 191 1968 0:00:03.031 218:21:33.233
collector 404 8 1 53 604 0:00:04.906 218:21:32.796
SoftMon 668 8 5 88 40492 0:13:36.093 218:21:32.593
svchost 788 8 6 138 2692 0:00:17.250 218:21:32.562
wdfmgr 840 8 4 70 1496 0:00:00.359 218:21:32.343
rvd 1300 8 16 225 41232 2:02:13.812 218:21:30.218
rcgui 2784 8 2 42 1048 0:00:03.250 218:21:15.140
explorer 3868 8 13 520 14632 0:14:39.062 195:14:12.519
UdaterUI 4828 8 5 125 3232 0:00:11.343 195:14:11.394
shstat 3532 8 8 84 1780 0:00:01.250 195:14:11.332
Matrox.PowerDesk SE 3392 8 1 52 4572 0:00:15.296 195:14:11.300
Mctray 4236 8 1 25 564 0:00:08.687 195:14:11.160
SDClientMonitor 5176 8 1 38 864 0:00:04.125 195:14:11.035
SweetIM 3732 8 5 157 1956 0:00:06.078 195:14:10.566
jusched 5132 8 3 205 1716 0:00:06.781 195:14:10.535
aetcrss1 2492 8 2 64 884 0:00:04.093 195:14:10.504
RMC 656 8 26 814 38200 0:04:11.703 195:14:10.441
ctfmon 4068 8 1 188 1156 0:00:34.703 195:14:10.129
VideoAdvantage 4676 8 13 206 13844 0:01:12.296 195:14:09.769
ifagent 2028 8 3 71 876 0:00:14.046 195:14:09.347
YahooMessenger 4168 8 43 2331 37840 0:02:26.734 195:14:09.285
IEXPLORE 4628 8 14 1033 42216 0:04:59.687 195:13:43.218
OUTLOOK 3084 8 27 1175 106664 0:27:30.453 190:18:05.551
WINWORD 680 8 18 932 46992 0:02:50.546 190:17:52.831
pskill 680 \\ldn-sales-pc24
Saves your legs a bit, handy for remote support too
Ringo
Monday, 21 July 2008
Tibco RVD Monitoring stats
Here's a basic perl script to help you monitor the status or RVD clients on your infrastructure -> rvhosts.pl
Ive found this useful to look for any users machines who maybe stuggling on the network due to performance issues ( CPU or RAM limitations).
I.E
Host "172.27.36.155" lost point-to-point message
RV: Lost 1 broadcast messages from host "172.27.36.155"
ERROR: RV: Lost 1 broadcast messages from host "172.27.36.155"
ERROR: RV: Host "172.27.36.155" lost point-to-point message
RV: Lost 2 broadcast messages from host "172.27.36.155"
RV: Lost 2 broadcast messages from host "172.27.36.155"
ERROR: RV: Host "172.27.36.155" lost point-to-point message
What the script basically does is listens to RVD status messages ( which rvd process generates every 90 seconds )and displays in a readable format.The headings are quite useful as its difficult to find documentation on this .
tibrvlisten -daemon ... -network ... - service... "_RV.>"
#hostaddr ip address of host
#sn Serial number or ticket file
#os version of Operating system
#ver rvd version
#up rvd uptime
#ms Messages Sent
#bs Bytes Sent
#mr Messages Received
#br Bytes Received
#ps Packets sent
#pr Packets received
#rx *Retransmitted Packets
#pm *Missed Packets
Adapt this script slightly and you can print stats to a webpage or .csv fomat for excel/reporting.

Best Regards
Chris
Friday, 18 July 2008
Perl Script to email on NT backup failure
Dear All,
Its handy to know when your auto backup product ( in this case Microsoft NT Backup) has failed on your Server or PC.
It maybe because disk space is low or data corruption, either way you want to know about it, so you can resolve the problem before you miss too many backups.
The perl script below checks a log directory for last updated file and looks for Error keywords and then emails out to admin@email.com
Download the Windows Sendmail ' bmail ' client app, this works great
#!C:\Perl\bin\perl.exe
# SEARCH-NEW-ERROR-EMAIL.PL
# list files in a directory and sort by Modified time
# check for 'Error' in last last modofied file and email if exisits
# ----help@infrasup.com March 2008
$dir = "C:\\Documents and Settings\\Administrator\\Local Settings\\Application Data\\Microsoft\\Windows NT\\NTBackup\\data\\";
opendir (DIR, $dir);
@dir=readdir(DIR);
closedir(DIR);
@dir = sort { -M "$dir/$a" <=> -M "$dir/$b" } (@dir);
print "@dir\n"; # print all array entries
$file=$dir[0]; # only print files not '.' or '..'
print "$file\n";
# convert unicode log files to ansi file for searching for string
print "$dir$file\n";
open (CONVERT, "|type \"C:\\Documents and Settings\\Administrator\\Local Settings\\Application Data\\Microsoft\\Windows NT\\NTBackup\\data\\$file\" > $file ") ;
sleep 5;
print "copied $dir$file to local $file \n";
sleep 2; # little pause to ensure files copied
# search for Error in file
#
#
#
#
open (STRINGS, "$file");
foreach $line ()
{
if ($line =~ m/Error(.*) ./)
{
#$found=1 ;
$description=$1;
print " found Error $description\n" ;
$found="errors found" ;
#print " hello" ; # add new line this is the last field
}
#print "$description" ; # print ; field delimiter for excel
}
print "$found\n";
## email results
if ($found eq "errors found") {
print "MAILED\n";
open (MAIL, "|\"c:/Program Files/bmail/bmail\" -s MAILSVR -t admin\@email.com -a \"Found Error in file backup file '$file' \" -f backups\@email.com -m $file ") || die "bmail failed:$!\n";
}
# note: del .log files in current script directory using a batch file
You can set this script to run every day using Windows Scheduler
Enjoy, Akbel
Its handy to know when your auto backup product ( in this case Microsoft NT Backup) has failed on your Server or PC.
It maybe because disk space is low or data corruption, either way you want to know about it, so you can resolve the problem before you miss too many backups.
The perl script below checks a log directory for last updated file and looks for Error keywords and then emails out to admin@email.com
Download the Windows Sendmail ' bmail ' client app, this works great
#!C:\Perl\bin\perl.exe
# SEARCH-NEW-ERROR-EMAIL.PL
# list files in a directory and sort by Modified time
# check for 'Error' in last last modofied file and email if exisits
# ----help@infrasup.com March 2008
$dir = "C:\\Documents and Settings\\Administrator\\Local Settings\\Application Data\\Microsoft\\Windows NT\\NTBackup\\data\\";
opendir (DIR, $dir);
@dir=readdir(DIR);
closedir(DIR);
@dir = sort { -M "$dir/$a" <=> -M "$dir/$b" } (@dir);
print "@dir\n"; # print all array entries
$file=$dir[0]; # only print files not '.' or '..'
print "$file\n";
# convert unicode log files to ansi file for searching for string
print "$dir$file\n";
open (CONVERT, "|type \"C:\\Documents and Settings\\Administrator\\Local Settings\\Application Data\\Microsoft\\Windows NT\\NTBackup\\data\\$file\" > $file ") ;
sleep 5;
print "copied $dir$file to local $file \n";
sleep 2; # little pause to ensure files copied
# search for Error in file
#
#
#
#
open (STRINGS, "$file");
foreach $line (
{
if ($line =~ m/Error(.*) ./)
{
#$found=1 ;
$description=$1;
print " found Error $description\n" ;
$found="errors found" ;
#print " hello" ; # add new line this is the last field
}
#print "$description" ; # print ; field delimiter for excel
}
print "$found\n";
## email results
if ($found eq "errors found") {
print "MAILED\n";
open (MAIL, "|\"c:/Program Files/bmail/bmail\" -s MAILSVR -t admin\@email.com -a \"Found Error in file backup file '$file' \" -f backups\@email.com -m $file ") || die "bmail failed:$!\n";
}
# note: del .log files in current script directory using a batch file
You can set this script to run every day using Windows Scheduler
Enjoy, Akbel
Monday, 14 July 2008
Reuters DACS check GUI Modifications
Reuters use Sybase ( Even in DACS 6) as the prefered database for storing users permissions to exchange data for RMDS5 and RMDS6.
Oftern its quicker in Sybase to run SQL queries, than wait for DACS to finish its reporting.
ASE ISQL is quite a nice tool to run from your PC ( similar to Toad)that enables you to interigate the Sybase directly ( without need for DACSUI installed)
For Example, if you want a list of the recent user permissions removed by the DACSUI from the dacs_main database ( on Reuters DACS 5.1 and above) , connect to the Sybase Database manager using the connection parameters below in your sql.ini

then run sql to see modifications
select * from user_ae where site like 'your-site' order by deactivation desc
To find who made the distribtuion changes ( assuming dacs admin user have seperate i'd that they use to make changes)
select * from load_control where site like 'your-site' order by commit_time desc
Some of these sql queries could be created into perl html scripts to display view only output in an intranet for example
Best Regards
Chris
Friday, 4 July 2008
Alternative to Microsoft Exchange and SBS 2003
Over the last few months we've been testing alternative open source products to Microsoft SBS 2003 and Exchange.
Open
Source is intended to be an alternative method of writing software,
were you offer the source code to be downloaded on the public domain.
The Methodology prevents previous 'Black Box' proprietary
systems, removing the need for clients to always use the same Vendor.
This has the additional benefit for the authoring company that their
product can be tested on many different Hardware, in the community and
reducing the amount of support needed. Also any suggestions for future enhancements can be receieved from the many community contributors
Many Open source solutions offer a community edition to test ( with most features
enabled) or a 30 dat trail, then you need to purchase the full blown version to get the Business critical parts.
Often a support package is needed as well to insure Updates and Telephone/Web based support is available.
One product we have found to be very impressive is Scalix, a serious alternative to Microsoft SBS and Exchange.
You can download a community edition FREE of charge and Installation, Admin
and Migration manuals and Community forums are well used and supported.
Scalix also has an Outlook connector available so you don't even need to change the clients apps.
Run this on top of Redhat RHEL 5 and you have a great, out of the box, replacement for MSoft's/ Lotus domino bespoke system Freeing you use use non Microsoft Groupware solutions ( Anti Sharepoint)
If you would like a trail on this type of solution, which we are now offering as a alternative for Virtual HQ / VPN cleints, Please contact sales and ask for Mark.
XBox 360 overheats
Apparently early Xbox 360's have issues with overheating.
We would ALWAYS recommend you talk to Microsoft before opening your XBOX.
0870 60 10 100 . They currently offer a FREE repair service
The infamous 3 'red lights of death' display a hardware issue and most times its caused by what appears to be a design fault by Microsoft.
You can debug the error further by extracting a four digit code.
http://www.clevermod.com/index.php?article=38
We've read Various websites and other blogs relating to the VRAM on Main board and Processor issues.
Some users who have sent back their XBOX to Microsoft for repair ( which is the best option - see below) have had Sticky pads fixed to the bottom of the main PCB.
This modifaction appears to fix the main board away from the bottom of the case ( to increase cooling) and to help keep the VRM in position ( some soldering issues have also been mentioned on the VRAM)
So far weve tried 'Pennie mods' and Over heat 'wrapping towel around 360' to clear the lights, but not the ice and vinegar!
But in our experince, after a few minutes the green lights always change back to RED again.
If your XBOX has the S/N sticker and "Microsoft" logo slicker intact, and no obvious signs of opening and was manufactured after Oct 2005, Microsoft will replace your XBOX Free of Charge.
So DONT play with the insides of your XBOX before speaking to Microsoft.
Hope this clarifies things, Ringo
Subscribe to:
Posts (Atom)